BWHeader

Fire Starters Then and Now

Two years ago I made fire starters for folks who have woodburning fireplaces. I used pinecones from my garden, cedar shavings (result of running cedar planks through a planer), wax, twine, and cinnamon sticks.

Firestarters 2012

This year I thought I would try something a bit different. I have boxes of dried plant materials from my garden. I collected and dried them to use in my work. I haven’t found a need for them. I had thought about tossing them in the recycle bin, but decided to use them for fire starters.

Firestarters In Progress

I lined some old muffin tins with cupcake papers and filled them with dried materials and cedar shavings. Then used cotton twine for wicks. The wicks are bound around cypress pods. Then the lot was topped with paraffin.

Firestarters Detail

I also made a few pinecone fire starters.

Firestarters In Basket

Placed the fire starters in baskets lined with tissue and filled with cedar shavings. Everything can be used for starting fires, including the baskets.


I was curious how the fire starters would work, so, I set some alight.

First a cupcake fire starters–

Firestarters Cupcake 1

Firestarters Cupcake 2

Then a pinecone–

Firestarters Pinecone 1

Firestarters Pinecone 2

Firestarters Pinecone 3

I had more fun watching them burn than making them!


Stone Church and Earrings

I recently returned from three weeks in Maryland. I was visiting my sister and her family. While I was there I attended a holiday bazaar at the church near their house. The exterior of the church is stone, has a slate roof, and was founded in 1784. It also has a great cemetery.

Exterior of Church

I was hoping that the interior of the church would be as interesting as the exterior. I was a tad disappointed that the interior wasn’t stone, but there were some great details.

Just inside the front door there is a narrow door that spans the wall to the ceiling. The curious person that I am; I opened the door. I found a rope. Yep it is the rope for the bell.

Church Bell Rope

I bought several things from Jim St. Germain at the holiday bazaar. He makes jewelry from found metal bits–typewriters, hang gliders, sewing machines, radios, computers, VHS tapes…

These are a few of the earrings that I purchased–

Earrings

Sewing Machine Parts

Earrings

Hang Glider Parts

Earrings

Radio Parts

I like that Jim used found objects and gave them a new life.

I am always on the lookout for potential art materials and tools. Also at the holiday bazaar I found copper cookie cutters and a large bag of vintage yarn. The lot was a steal for $5.00.


What Is It? A Soy Candle???

I bought soy wax flakes when I was attempting to use wax on wool. I didn’t use the wax molten. I added a solvent to it. Then I applied the cold wax to the wool pieces. I wasn’t happy with the results so I thought that it would be fun to use the soy wax to make candles.

After reading several tutorials on making soy candles I thought that I could make easy peasy gifts for the holidays. I was looking forward to binding cinnamon sticks and pine greens to the jars.

I found a great tutorial on Hello Natural.

I followed the instructions. Poured the candles. Everything went well or so I thought. Then an interesting thing happened. The soy wax started to change and grow as it was cooling. Looks a bit like mold growth which I actually like, but not good for a gift.

Soy Candle

I googled the results, but couldn’t find an explanation as to why the soy wax changed. Probably it was a temperature issue. Perhaps the wax was too warm when it was poured. I was working in my studio space in the garage. While it was not cold, the jars were definitely much cooler than the wax. But maybe it had something to do with the addition of the spices. Could the oil in the spices that I added have altered the wax?

I broke off a chuck of the wax. The interior was very dry and powdery.

Powdery Soy Candle

I have used a variety of waxes over the years and have never experienced anything peculiar. I used wax for prototypes, as molds for dried plant parts, casting, and molten wax to integrate and age materials.

I don’t look at the result as a failure. It is a problem to be solved. More research is needed. Maybe in the future I will have a need for wax that looks a bit like mold.


Cracked and Melted Glass

I subscribe to several craft blogs so that I am never short of ideas for craft projects while visiting my niece and nephew. Occasionally, I will read about a technique or material that might be reworked for a project that I might want to make. A few days ago I read a post about cracked glass stones on the Dollar Store Crafts blog. The instructions were simple–oven temperature 425º for 20 minutes and then an ice bath.

I liked the idea of it, heating glass stones and then immersing them in ice water for a rapid cooling. This is not all that different from raku firing, remove work from a hot kiln, then cooling it quickly in a bucket of water. Quenching after raku firing is more dramatic, but a similar notion.

I thought that I would give it a try. Picked up a bag of glass stones at the local Dollar Tree. Surprised to find 100 stones in the bag.

Glass Stones Before

I lined the baking sheet with paper and spaced the stones a finger width apart.

Glass Stones After

The paper liner came in handy to lift and pour the hot stones into the ice bath.

Glass Stones in Ice Bath

Stones in the ice bath.

Glass Stones Cracked

The result is some nice and at times subtle fractures.

What are my plans? I was thinking about the possibility of using fractured glass bits as part of code in some of my work. I could use the color of the stones or the method for binding them to act as an aesthetic element which is also code.

I got to thinking about some tests that I did in a kiln firing with metal tins and glass beads. I had a bunch of beads left from some craft projects and thought might be able to somehow use them.

Glass Beads Fired in Kiln

Glass beads with a bit of metal mesh in tin fired to approximately cone 015.

Glass Beads and Pins Fired in Kiln

Glass beads and straight pins in tin fired to approximately cone 015.

I was hoping for some slumping of the glass over the metal bits. That didn’t happen, but there is always something positive with every test. Something to use in a different way or to build on. Sometimes I may not integrate the results into a project for several years. It is important to keep records. It saves a lot of time and testing in the future.


Possible Stitches for Fabric

I loom knit a bit and have been thinking about knitting flat fabric for use in some mixed media pieces. I had the idea of flat stitching rows then repeating a flat stitch 5 times on each peg, followed with rows of flat stitches. I was hoping for an I-cord grid. The I-cord element has a bit of a twist which I’m keen on. Probably the result of operator error, but It may not be a problem when using rope. I like the second swatch which is a combination of knit with purl I-cords.

Flat I-cordKnit Purl I-cord


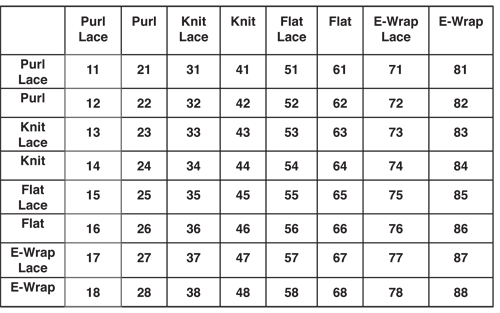
I read about a mock crochet technique on the Guppy Girl blog. I liked the openness of the stitch and decided to make some test swatches using the idea of three forward, back two, repeat… using purl, knit, flat, and e-wrap stitches. For lack of a better description, I named them lace (purl lace) and assigned each stitch and its counterpart (purl) a number.

1. Purl Lace
2. Purl
3. Knit Lace
4. Knit
5. Flat Lace
6. Flat
7. E-Wrap Lace
8. E-Wrap

There are eight stitches with eight combinations, 64 unique swatches. Even though some of the stiches are directional, I decided to treat stitch combinations with the same numbers (1,2 and 2,1) as duplicates. Since the front and back of the knitted pieces are not often the same I anticipated some additional choices.

These are the combinations–11 is Purl Lace with Purl Lace, 45 is Knit with Flat Lace, 56 is Flat Lace with Flat…
Table

I made 36 swatches in the following combinations. From the 36 I selected a few to develop.
Swatches Made

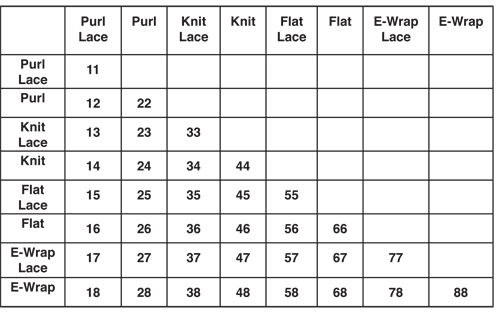
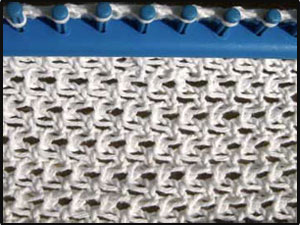
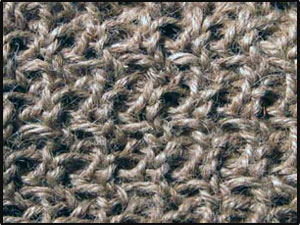
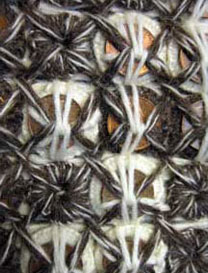
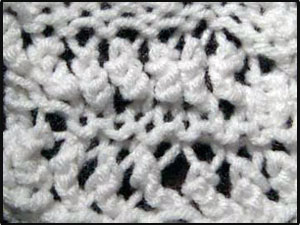
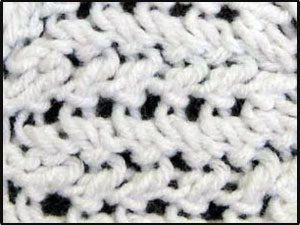
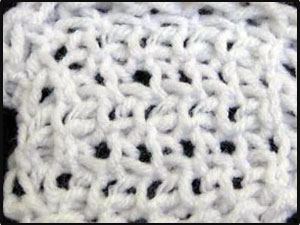
Here are some images of the swatches I am considering using. I did a rather loopy cast on so it was clear to me which was the front top.

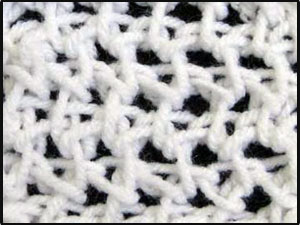
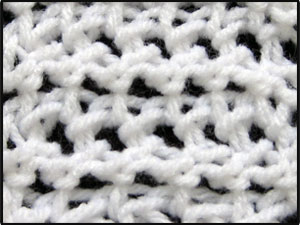
11 Purl Lace with Purl Lace; 33 Knit Lace with Knit Lace

1133


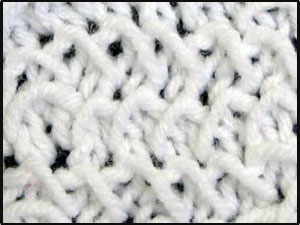
55 Flat Lace with Flat Lace; 57 Flat Lace with E-Wrap Lace
5557


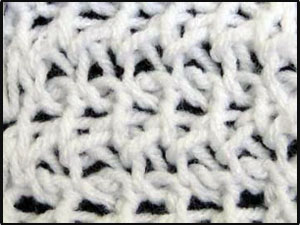
77 E-Wrap Lace with E-Wrap Lace; 17 Purl Lace, E-Wrap Lace
7717


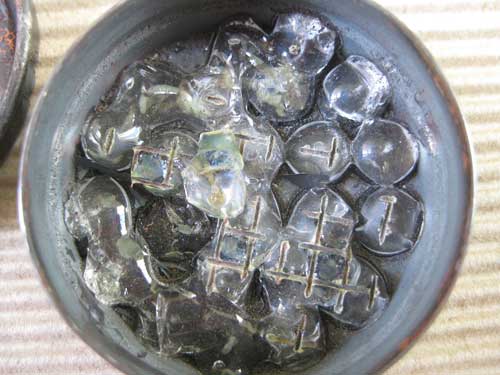
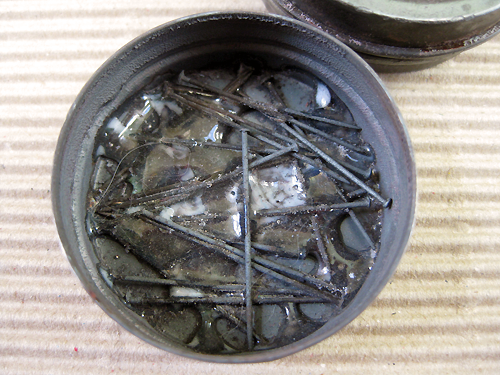
The swatches were to give me a notion of possible stitch combinations I could use to make fabric from three types of rope–4-ply cotton, coconut fiber, and jute. After I decide on the stitch combinations, I will need to make a loom to accommodate the thickness of the rope.

Rope

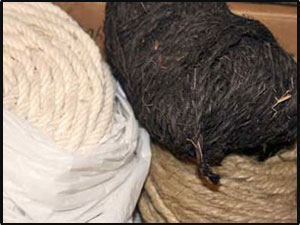
I am in the process of making some larger swatches knitted in cotton and jute twine. To keep the twine from becoming too tight, I placed a piece of dowel on the peg as it was wrapped and knitted off.

CottonJute Twine


Valentine’s Gifts 2012

I like to make fun holiday gifts for the kids in my family. I gave felt a go and realized that I am not one with it. The same was true with buttons. I use binding, embroidery, weaving, and knot techniques in my work so I decided to use some of those techniques to make Valentine’s gifts.

I have been collecting rocks to send to my nephew to add to his collection. This rock is quite heart-like, so I bound it with red rayon embroidery floss for a necklace, or to hang on the wall.

StoneHeart

I have been binding washers to use for code components in some of my pieces. This is a detail of a piece titled, Make Your Own Luck. I used two washer sizes. The color of the washers replace dots and dashes and the smaller bound washers the spaces between letters within words and between words.

LuckDetail

This is a detail that has the washers without binding for spacers and with half binding or full binding to correspond to dots and dashes. The Piece has the full text, “See no Evil, Hear no Evil, Speak no Evil, Do no Evil”. The border is coded, “Not to know is bad, not to wish to know is worse”.

DoNoEvil

A couple of years back I saw this blog post at thesmallobject.com using washers to make a necklace based on the work of Anni Albers. This is a photo from the blog post written by Sarah Neuburger.

NeuburgerPhoto

Here is the link to see her great instructions.

So, I got to thinking about binding washers with embroidery floss and then stringing them together with a braid. This is what I came up with. It isn’t chocolate but I think the my niece will like it.

ValentineBracelet

I made some Shrinky Dink bits to use for greeting cards. Realized when I was binding them to the cards that if I made the cord a tad longer the lot could be worn as a bracelet.

ValentineCards

Some of my work can be viewed at GirlArtist.