Monday Morning
Tuesday Night

Monday Morning
Tuesday Night
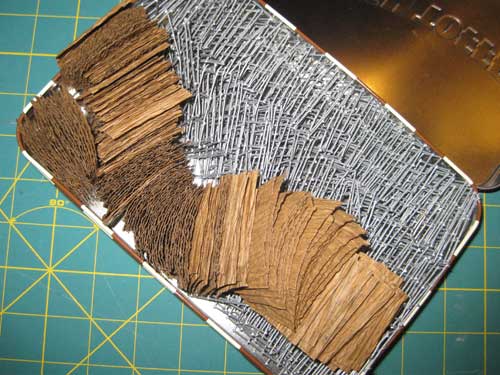
Tonight completed all 180 “blocks” for my current Make Your Own Luck piece.
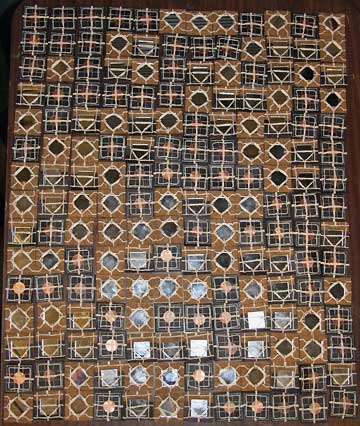
The plan is to attach the blocks to a piece of 1″ hardware cloth to make the piece more stable and stronger for hanging. Since the “blocks” are approximately 1 3/4″ there will be space between for a reinforced stitched border.
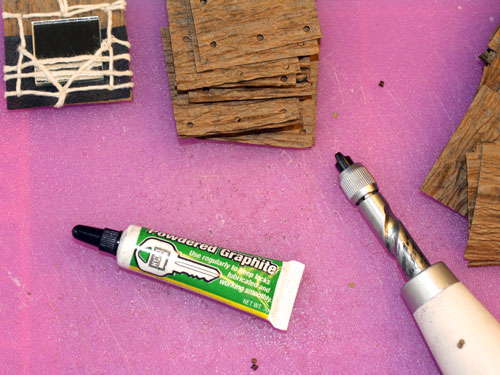
All the hole punching caused the screw punch to freeze up a bit. Graphite solved the problem.
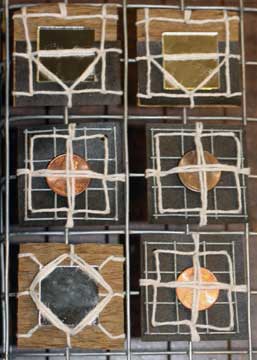
“Blocks” to use for dots, dashes, and spacers.
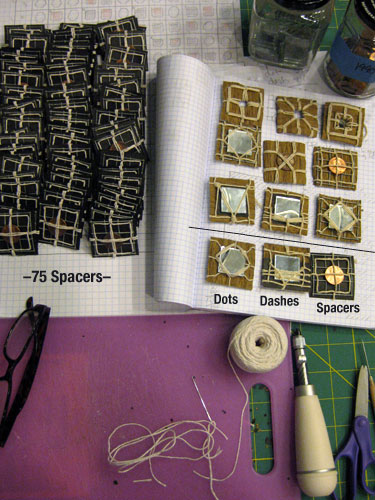
75 Spacers Completed–Hardware Cloth, Roofing Felt, Cotton Twine, and Pennies from the 90s
To Complete–61 Dots and 44 Dashes.
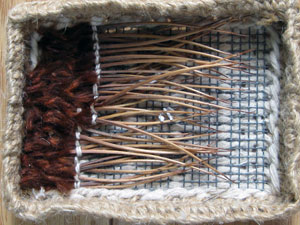
I am in the process of cutting, punching, and assembling components for a piece that will be a continuation of my Make Your Own Luck series.
Often I work directly on hardware cloth, but for this piece I decided to make separate components to be assembled rather like quilt blocks.
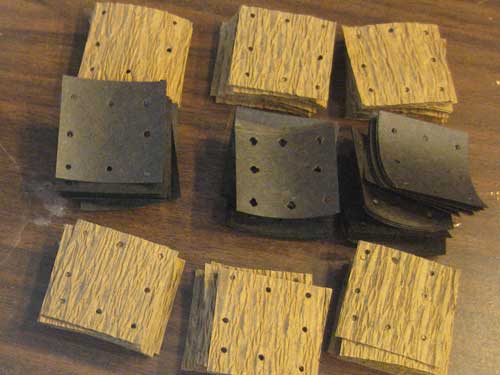
I cut 180 pieces of 1/2″ hardware cloth. Each piece is 3 squares by 3 squares, and will be bound between a layer of tree wrap and roofing felt.
There will be three components to represent dots, dashes, or spacers in the coded message–See a penny, pick it up, all the day have good luck. Each dot and dash component will have a piece of mirror, and each spacer will have a penny bound to it. Haven’t decided on the needlework for the components.
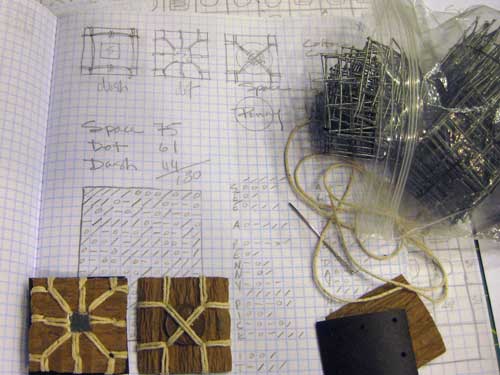
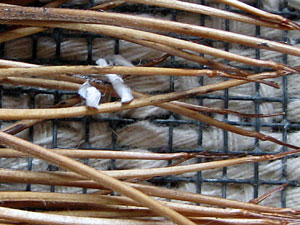
Since I will be making over 2,000 holes I tried different hole punches to find which works best for the job. I used the Martha Stewart Screw Punch, the hole punch my husband used when he was a paperboy, and the punch I used for palm bark.
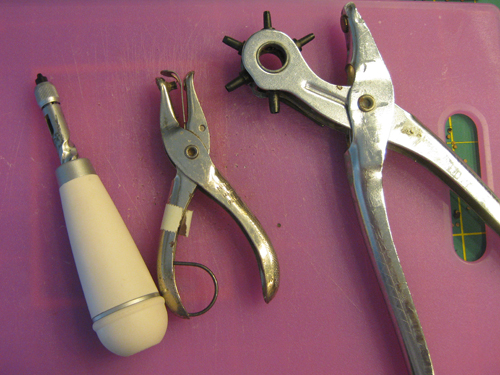
Each punch worked great considering the material. I found that the screw punch worked best when punching holes in more than one layer. I was able to use the screw punch with either hand, so when my dominant hand became weary I switched to my helper hand.
Since the materials are a tad sticky I frequently cleaned the punch bit with a needle tool.
Make sure when using any sharp tool that you keep clear of anything that might bleed.
I suspected that at some point, I would create the perfect environment for some type of insect. When you have loads of dried plant materials and fiber it is rather likely some critters will move in.
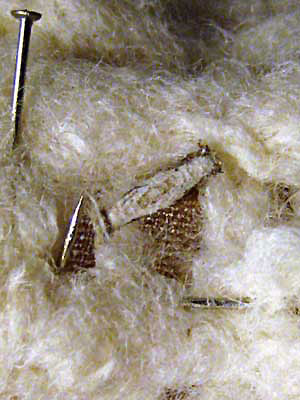
This is a detail of a work in progress. It would have been a cup made of wool and rayon that I just couldn’t manage to finish. The head of a straight pin is in the upper left of the photo, and the tip of a pin is next to the casemaking moth.
How Did I Find Moths?
I read an article that stated empty birds’ nests should be removed from around your house because casemaking moths might take up residence. I had a collection of nests containing little vignettes in my studio. When I checked them, I found casemaking moths. After the shock wore off, and the sinking feeling that everything in my studio might be destroyed; I methodically started the hunt for the critters. I discarded materials and several works in progress.
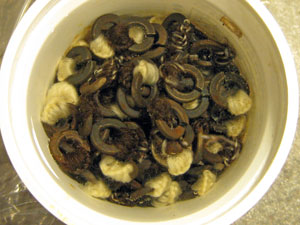
I did a test to see if I can save a piece if it is found to have moths. I soaked some works in progress that had been attacked by moths in vinegar for a couple of days, rinsed in water, and laid them in the sun. My hope is that if there were eggs, they were killed.
The vinegar soaking changed the appearance of the pieces. I bind fiber onto washers for use as coding components. The bottom row was soaked in vinegar. The washers are not the same type, but they have a similar composition. The fiber is wool that sustained a color change due to the oxidation of the metal. The change in color of the cream wool is not to my liking, so the solution would be to age the washers, then bind them.
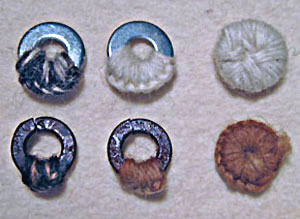
If the same or similar result occurs the next time I use a vinegar bath, I’m pretty sure that I will use the technique in the future to age some pieces. It is simple and non-toxic.
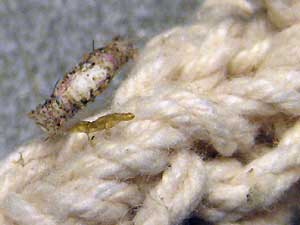
I found the casemaker moths–
Some insects are attracted to a particular color, fragrance or pheromone, or a location. I did not find a pattern or consistency in where they made their homes.
And it does not seem to matter if the fiber was impregnated with wax or shellac. It may be too early to tell, but I do not think that they took up residence in or on any of my work that was treated with salt.
This is the edge of a piece of foam core that I used for a photo set-up.
For More Information From Reliable Sources–
Casemaking Clothes Moth AgriLife Extension Texas A&M
Clothes Moths by Mike Potter, Extension Entomologist, University of Kentucky, College of Agriculture
Clothes Moths University of California Agriculture & Natural Resources, Statewide Integrated Pest Management Program
The past weekend I found some fiber looking somethings near the baseboard in the family room. On closer inspection and after a google search I found out the terrible news. They are Tinea pellionella, casemaking moths.
They are known as casemaking moths because according to the Statewide Integrated Pest Management site of University of California Agriculture and Natural Resources, “…always carry a silken case with them as they feed. They never leave this silken tube, but enlarge it as they grow.” Apparently the case is supposed to be the color of the fabric they have eaten. Most of the critters I found on the gray-green wool carpet are rather tan.
So here is the thing, if they stay in their silken vessel and it grows with them, and they are rather small when I find them, two questions come to mind.
How long have I not seen them?
And how many are there that I can not yet see?
Totally creeps me out.
Apparently, the female can lay “an average of 40 to 50 eggs…” but I was unable to find out how many of those eggs will be viable.
Most of the information I found indicated that pyrethrin was the solution. I do not want to use dangerous chemicals. We share our home with house rabbits who frequent the space. Any chemical residue could end up on their fur which could be potentially dangerous when they groom themselves or each other. Actually if there are fumes, respiratory problems could occur as well.
I emailed my friend at the UC Botanical Garden to find out how to handle the situation. After talking with him, I pretty much decided that I would give the carpets a good cleaning and then probably try an application of Diatomaceous earth. Unless I opt for the new information that I found tonight on the Northwest Center for Alternatives to Pesticides site. The article stated that while cold temperatures are not effective, placing a space heater at 120º for 4 hours in the room where the moths have been found can be.
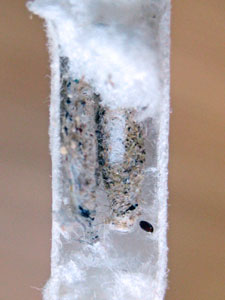
Then the horror of horrors occurred to me. I had read that it is a good idea to remove all bird nests near your house. The moths find nests a great place to thrive. I got a sick feeling when I realized I have nests in my studio. What if the moths have gotten in my studio? I have several pieces in progress, hung, and stored in the space; many have a fiber element. I started on one wall and made my way around the space. And it was confirmed that they really do like nests and even some of the work in progress had been attacked.
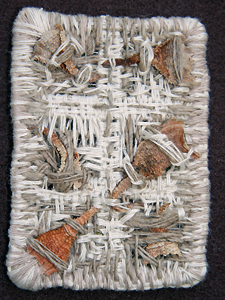
This is the interior of a lid that has protea seeds bound to hardware cloth.
Some work that is constructed of bound plant material and coated with wax had evidence of moths. There was one bronze and ceramic piece that had a single critter attached to its underside.
I disposed of most of the work. It was amazingly invigorating throwing out stuff. Then I found a ceramic cup bound with wool that had an application of shellac. I placed the piece in a container of vinegar.

I also had bound some split washers for a code piece and noticed there were a couple of critters in the container so I dumped the lot in vinegar. There is a single floating critter.
What I do not understand is why they did not attack the larger wool pieces that are in progress, but they did attach themselves to one of my clean work shirts hanging next to them. I’m glad it was the shirt.
Tomorrow I need to do a thorough cleaning of my studio.
Early on in my education at Ohio State University, I became aware of artists who would go to a site and use the materials present on that site to make a work. Often the work appeared as though it occurred naturally.
I had a romantic notion of visiting the woods near my parents’ home, connect with the site, and make a work. When I attempted it, I realized right off that I wasn’t alone. There were snakes, mosquitos, and ticks, all of which creeped me out.
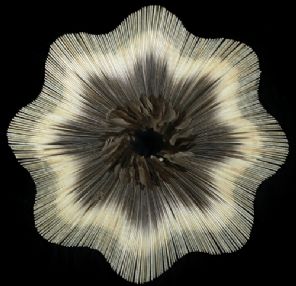
I recently read about Stuart Wood’s environmental work on the Studio ‘g’ blog. The images of his scorched patterns on trees gave me pause. I like the idea of using a scorching process to alter a material. And that controlling a potentially destructive process can result in something beautiful.
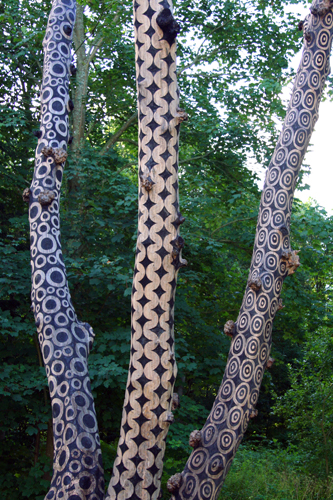
When I visited Stuart Wood’s website I found many gorgeous pieces. And I admit that I found myself saying out loud, “…really, seagull feathers.”
I often use dried plant parts in my work. Typically the plants must have some interesting tactile quality, be toxic, and have a cultural myth or superstition. I was looking through a stash of dried plant parts and found some Haworthia limifolia leaves. They have great texture with sharp and pointy tips.
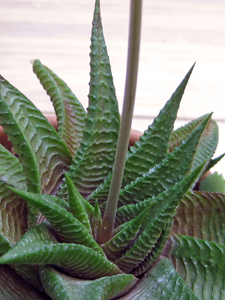
I googled Haworthia limifolia looking for information. I was a bit disappointed that the plant isn’t toxic. Apparently it is often used in place of Aloe for skin ailments. I did find a line that popped up in several articles, “Haworthia limifolia is often used by traditional healers as a spiritual remedy to ward off evil.” Curious. What kind of evil?
I have a contact at the UC Botanical Garden so I sent him an email inquiry about the plant. The plant is one that he gave to me several years back. He sent me a pdf of an article that I hadn’t read, Lightning Birds and Thunder Trees authored by Adrian Koopman. The article states that Haworthia is used as a charm to protect against lightning.
We don’t see much in the way of lightning where I live. Before reading about the plant’s reference to lightning, I had already bound the bits to a piece of hardware cloth to become part of a lid. My work must have the appearance of a life lived, so I age the work using one or more techniques–wax, heat, fire, salt, molten sugar, chemicals… and sometimes I bury the work.
The Haworthia bits are bound to the hardware cloth with cotton and bamboo fiber which works great with all of the techniques.
A few lightning information links–
S.A. Weather and Disaster Information Service, South Africa
Global Hydrology and Climate Center
Mortality Statistics–Victim of lightning by country
NOAA National Severe Storms Laboratory
I loom knit a bit and have been thinking about knitting flat fabric for use in some mixed media pieces. I had the idea of flat stitching rows then repeating a flat stitch 5 times on each peg, followed with rows of flat stitches. I was hoping for an I-cord grid. The I-cord element has a bit of a twist which I’m keen on. Probably the result of operator error, but It may not be a problem when using rope. I like the second swatch which is a combination of knit with purl I-cords.

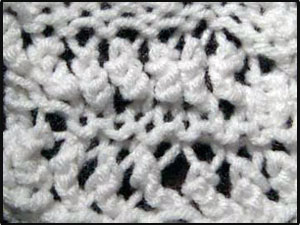
I read about a mock crochet technique on the Guppy Girl blog. I liked the openness of the stitch and decided to make some test swatches using the idea of three forward, back two, repeat… using purl, knit, flat, and e-wrap stitches. For lack of a better description, I named them lace (purl lace) and assigned each stitch and its counterpart (purl) a number.
1. Purl Lace
2. Purl
3. Knit Lace
4. Knit
5. Flat Lace
6. Flat
7. E-Wrap Lace
8. E-Wrap
There are eight stitches with eight combinations, 64 unique swatches. Even though some of the stiches are directional, I decided to treat stitch combinations with the same numbers (1,2 and 2,1) as duplicates. Since the front and back of the knitted pieces are not often the same I anticipated some additional choices.
These are the combinations–11 is Purl Lace with Purl Lace, 45 is Knit with Flat Lace, 56 is Flat Lace with Flat…
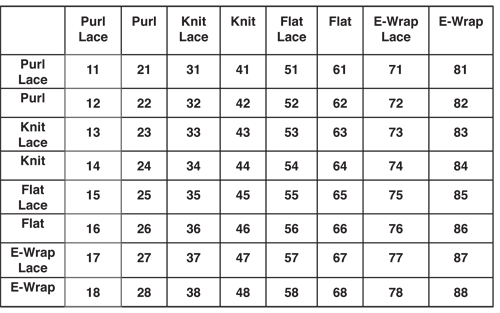
I made 36 swatches in the following combinations. From the 36 I selected a few to develop.
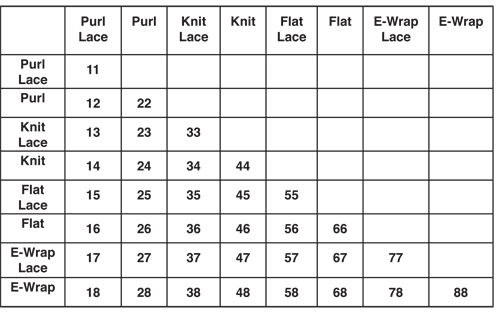
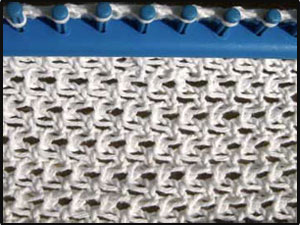
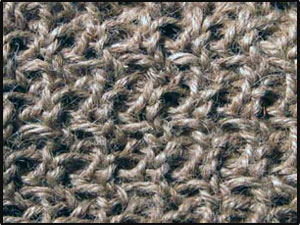
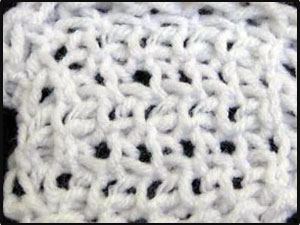
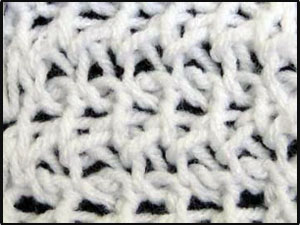
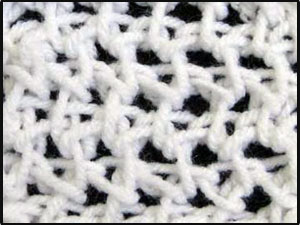
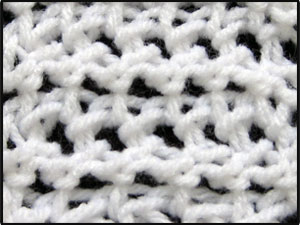
Here are some images of the swatches I am considering using. I did a rather loopy cast on so it was clear to me which was the front top.
11 Purl Lace with Purl Lace; 33 Knit Lace with Knit Lace
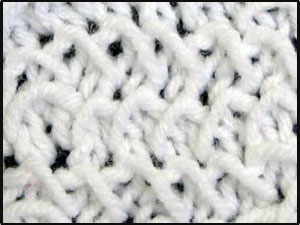
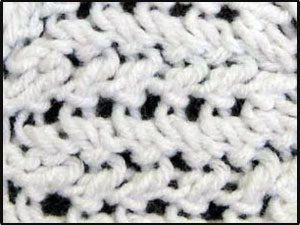
55 Flat Lace with Flat Lace; 57 Flat Lace with E-Wrap Lace
77 E-Wrap Lace with E-Wrap Lace; 17 Purl Lace, E-Wrap Lace
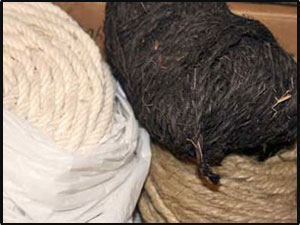
The swatches were to give me a notion of possible stitch combinations I could use to make fabric from three types of rope–4-ply cotton, coconut fiber, and jute. After I decide on the stitch combinations, I will need to make a loom to accommodate the thickness of the rope.
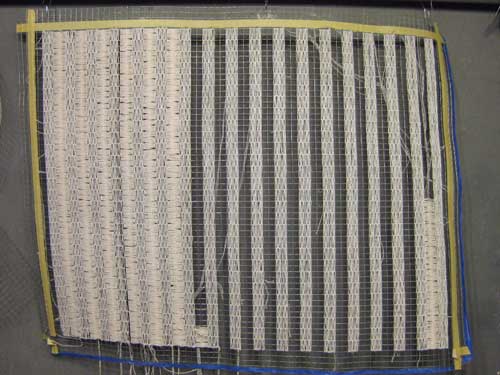
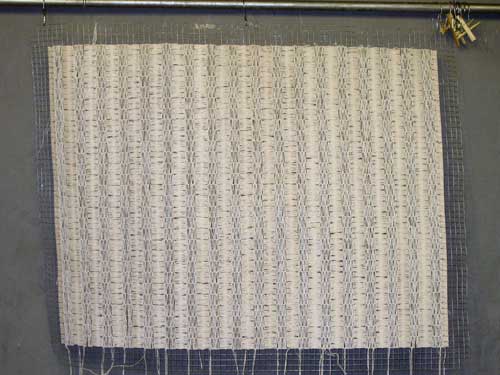
I am in the process of making some larger swatches knitted in cotton and jute twine. To keep the twine from becoming too tight, I placed a piece of dowel on the peg as it was wrapped and knitted off.